
 A little bit of gratitude goes a long way. I deal with lots of people through Baking with Gab, and I love that it puts me in contact with amazing, creative, kind people. Like Bianca from Communicake It, or Meredith from DeeDub Designs, or the lovely duo from TTotaler.
I strive to be positive and pleasant in all of the dealings with people who come into contact with the blog (and even those who don’t!) It’s just good practice.
After such a gloriously positive weekend last weekend, I had a bit of a downer yesterday. I was super proud of this vanilla and raspberry cake, but life didn’t respond to my enthusiasm with the same love.
So today I attended a group dachshund meet (yes, this is a thing, and it’s wonderful!), ate some delicious brunch and I’m listening to Lunchmoney Lewis on repeat. And I’m blogging about this beauty. My ungracious Saturday is already being forgotten.
I’m also contemplating opening up an Etsy cake shop – scary!
And I’m grateful. For my sausages, for my friends and family, for so much in my life right now.
Whatever you’re grateful for, let the world know.
Vanilla cake:
- 250g butter

- 3 cups sugar
- 5 eggs
- 3 cups plain flour
- 2 tsp bicarb
- 1 cup milk
- 3 tsp vanilla bean paste
Simple vanilla buttercream:
- 225g butter
- 4 cups icing sugar
- 2 tbsp milk
- 1 ½ tsp vanilla paste
- 1 cup raspberry jam
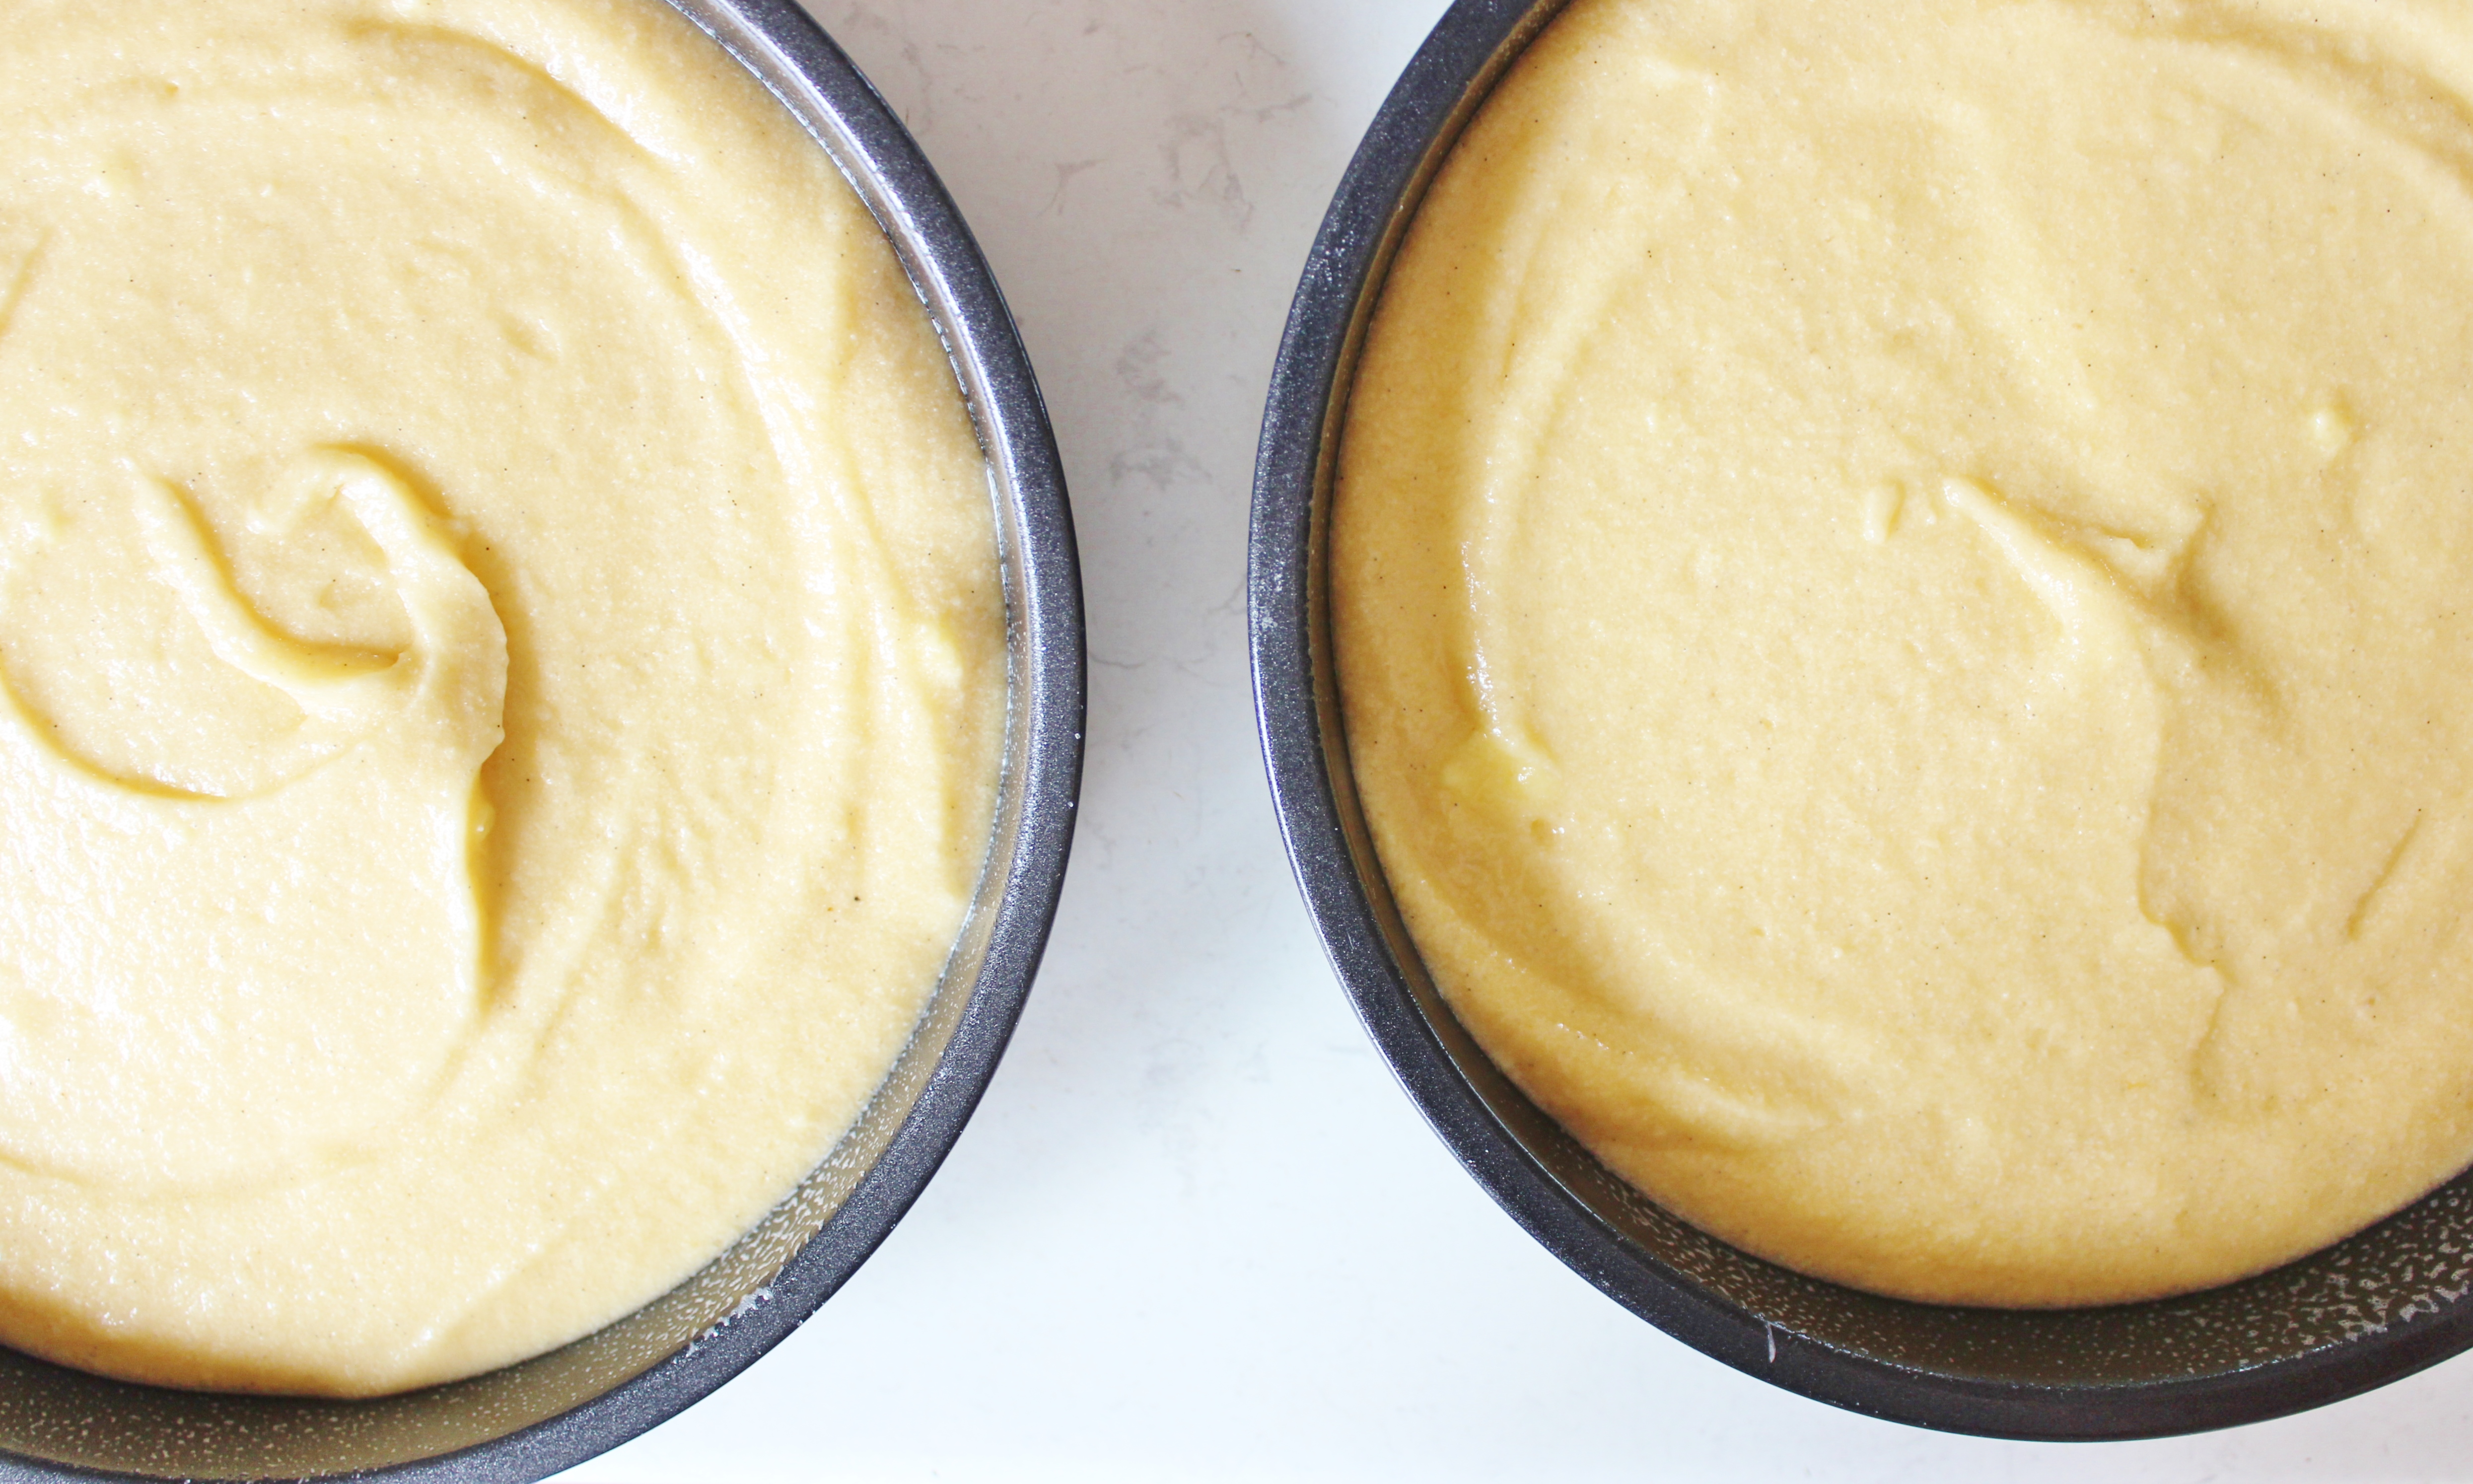
Grease three 8 inch baking tins and line the bases with a circle of baking paper. Preheat your oven to 180C.
 Cream together your butter and sugar on a medium speed until pale. Add in 2 of the eggs, mix, then ad in the remaining 3. Mix in your flour, one cup at a time, then the bicarb. Slowly pour in the milk and mix. Finally, mix in the vanilla bean paste (if you don’t have vanilla bean paste, use 2 tsp vanilla extract.)
Distribute your batter evenly across the three baking tins and pop them in the oven for 30-35 minutes, rotating them at the halfway point.
Once the cakes are done, allow them to cool for five minutes before turning out onto cooling racks. Allow to cool completely. Pop in the fridge for at least 15 minutes.
While the cakes are cooling, make a start on your icing by beating together your butter and one cup of icing sugar using the paddle attachment. Start of slowly so that your icing sugar doesn’t go everywhere, then turn it up to fast. Whip for about a minute, so that you get a nice pale yellow buttercream.
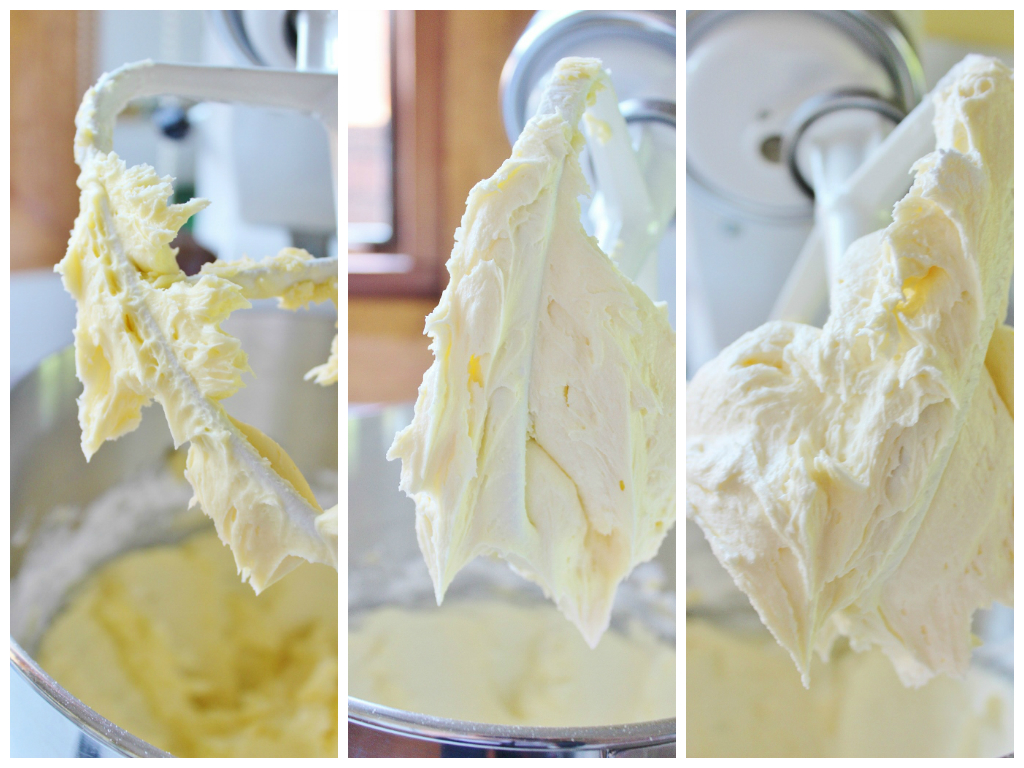
Add in the next cup of icing sugar and repeat; start of slowly, then turn up to high until it’s pale. Do this with each cup of icing sugar to get the whitest, creamiest icing. The high-speed whipping gets lots of air into the mixture, while the slow addition of icing sugar gets you fabulous, smooth icing. You can see the difference this beating process makes – the first photo is the buttercream after each addition of icing sugar and beating.
 Once your cakes have cooled completely, grab a bread knife and slice off a small amount of each of the tops, just so that the tops are level. Grab one cake and use a spatula or pallet knife to spread it with a thin layer of butter cream. Spoon half of the jam over the top and use the back of the spoon to spread almost all the way to the edge. Grab the next layer and spread its base with a thin layer of buttercream and place it on top of the jammed layer. Press down lightly.
 Spread a thin layer of buttercream over the second layer, then cover with jam. Don’t throw the jam spoon and bowl out.
Grab the final cake layer and spread the base with a thin layer of buttercream, then press down onto the second tier. If your layers are a little bit wonky, adjust them now. Breathe, that’s the building process over!
Pop them in the fridge to allow the buttercream to harden for 10 minutes.
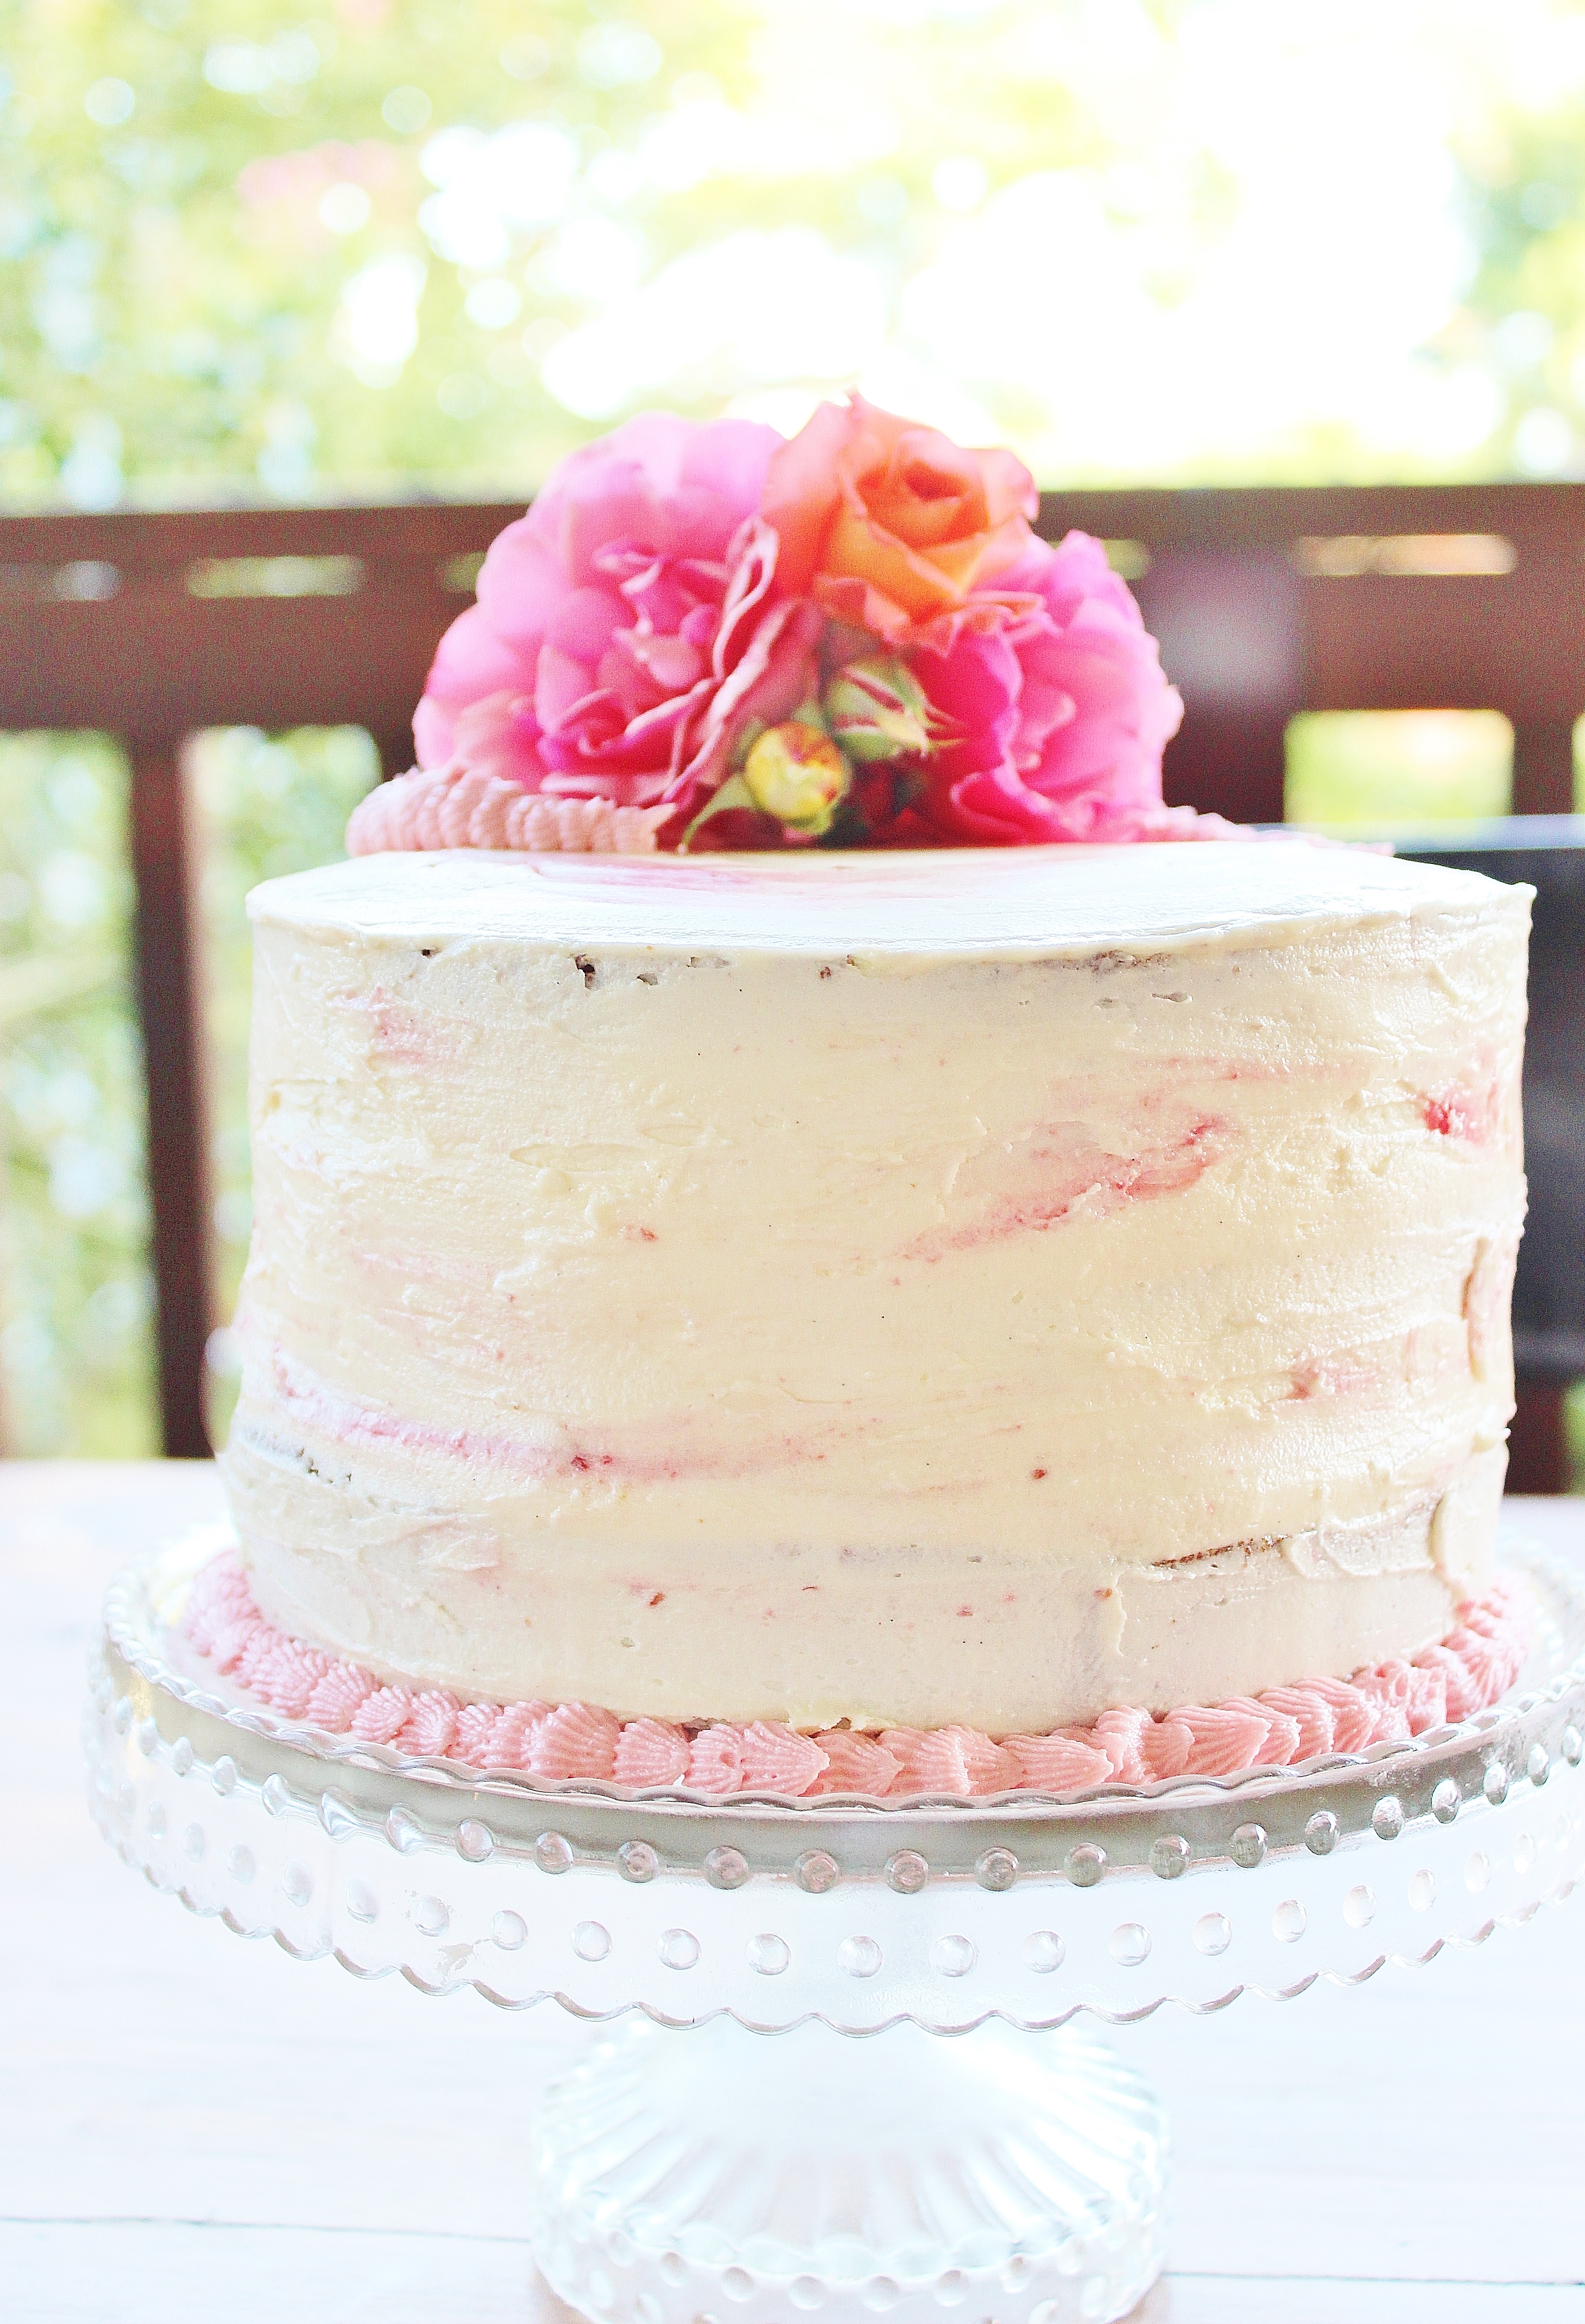
 Remove from the fridge and pop four bamboo skewers around the cake to help hold the tiers in place. Grab a chunk of buttercream with your palette knife and fill any holes that may be left in between the layers of cake. After this, spread a thin layer of buttercream around the entire cake – this is your crumb coat, it doesn’t have to be perfect. Don’t worry if you smear some jam, this will form part of the seams of pink later on.
Remove the skewers from the top and spread a thin layer over the top as well. Return to the fridge for 15 minutes.
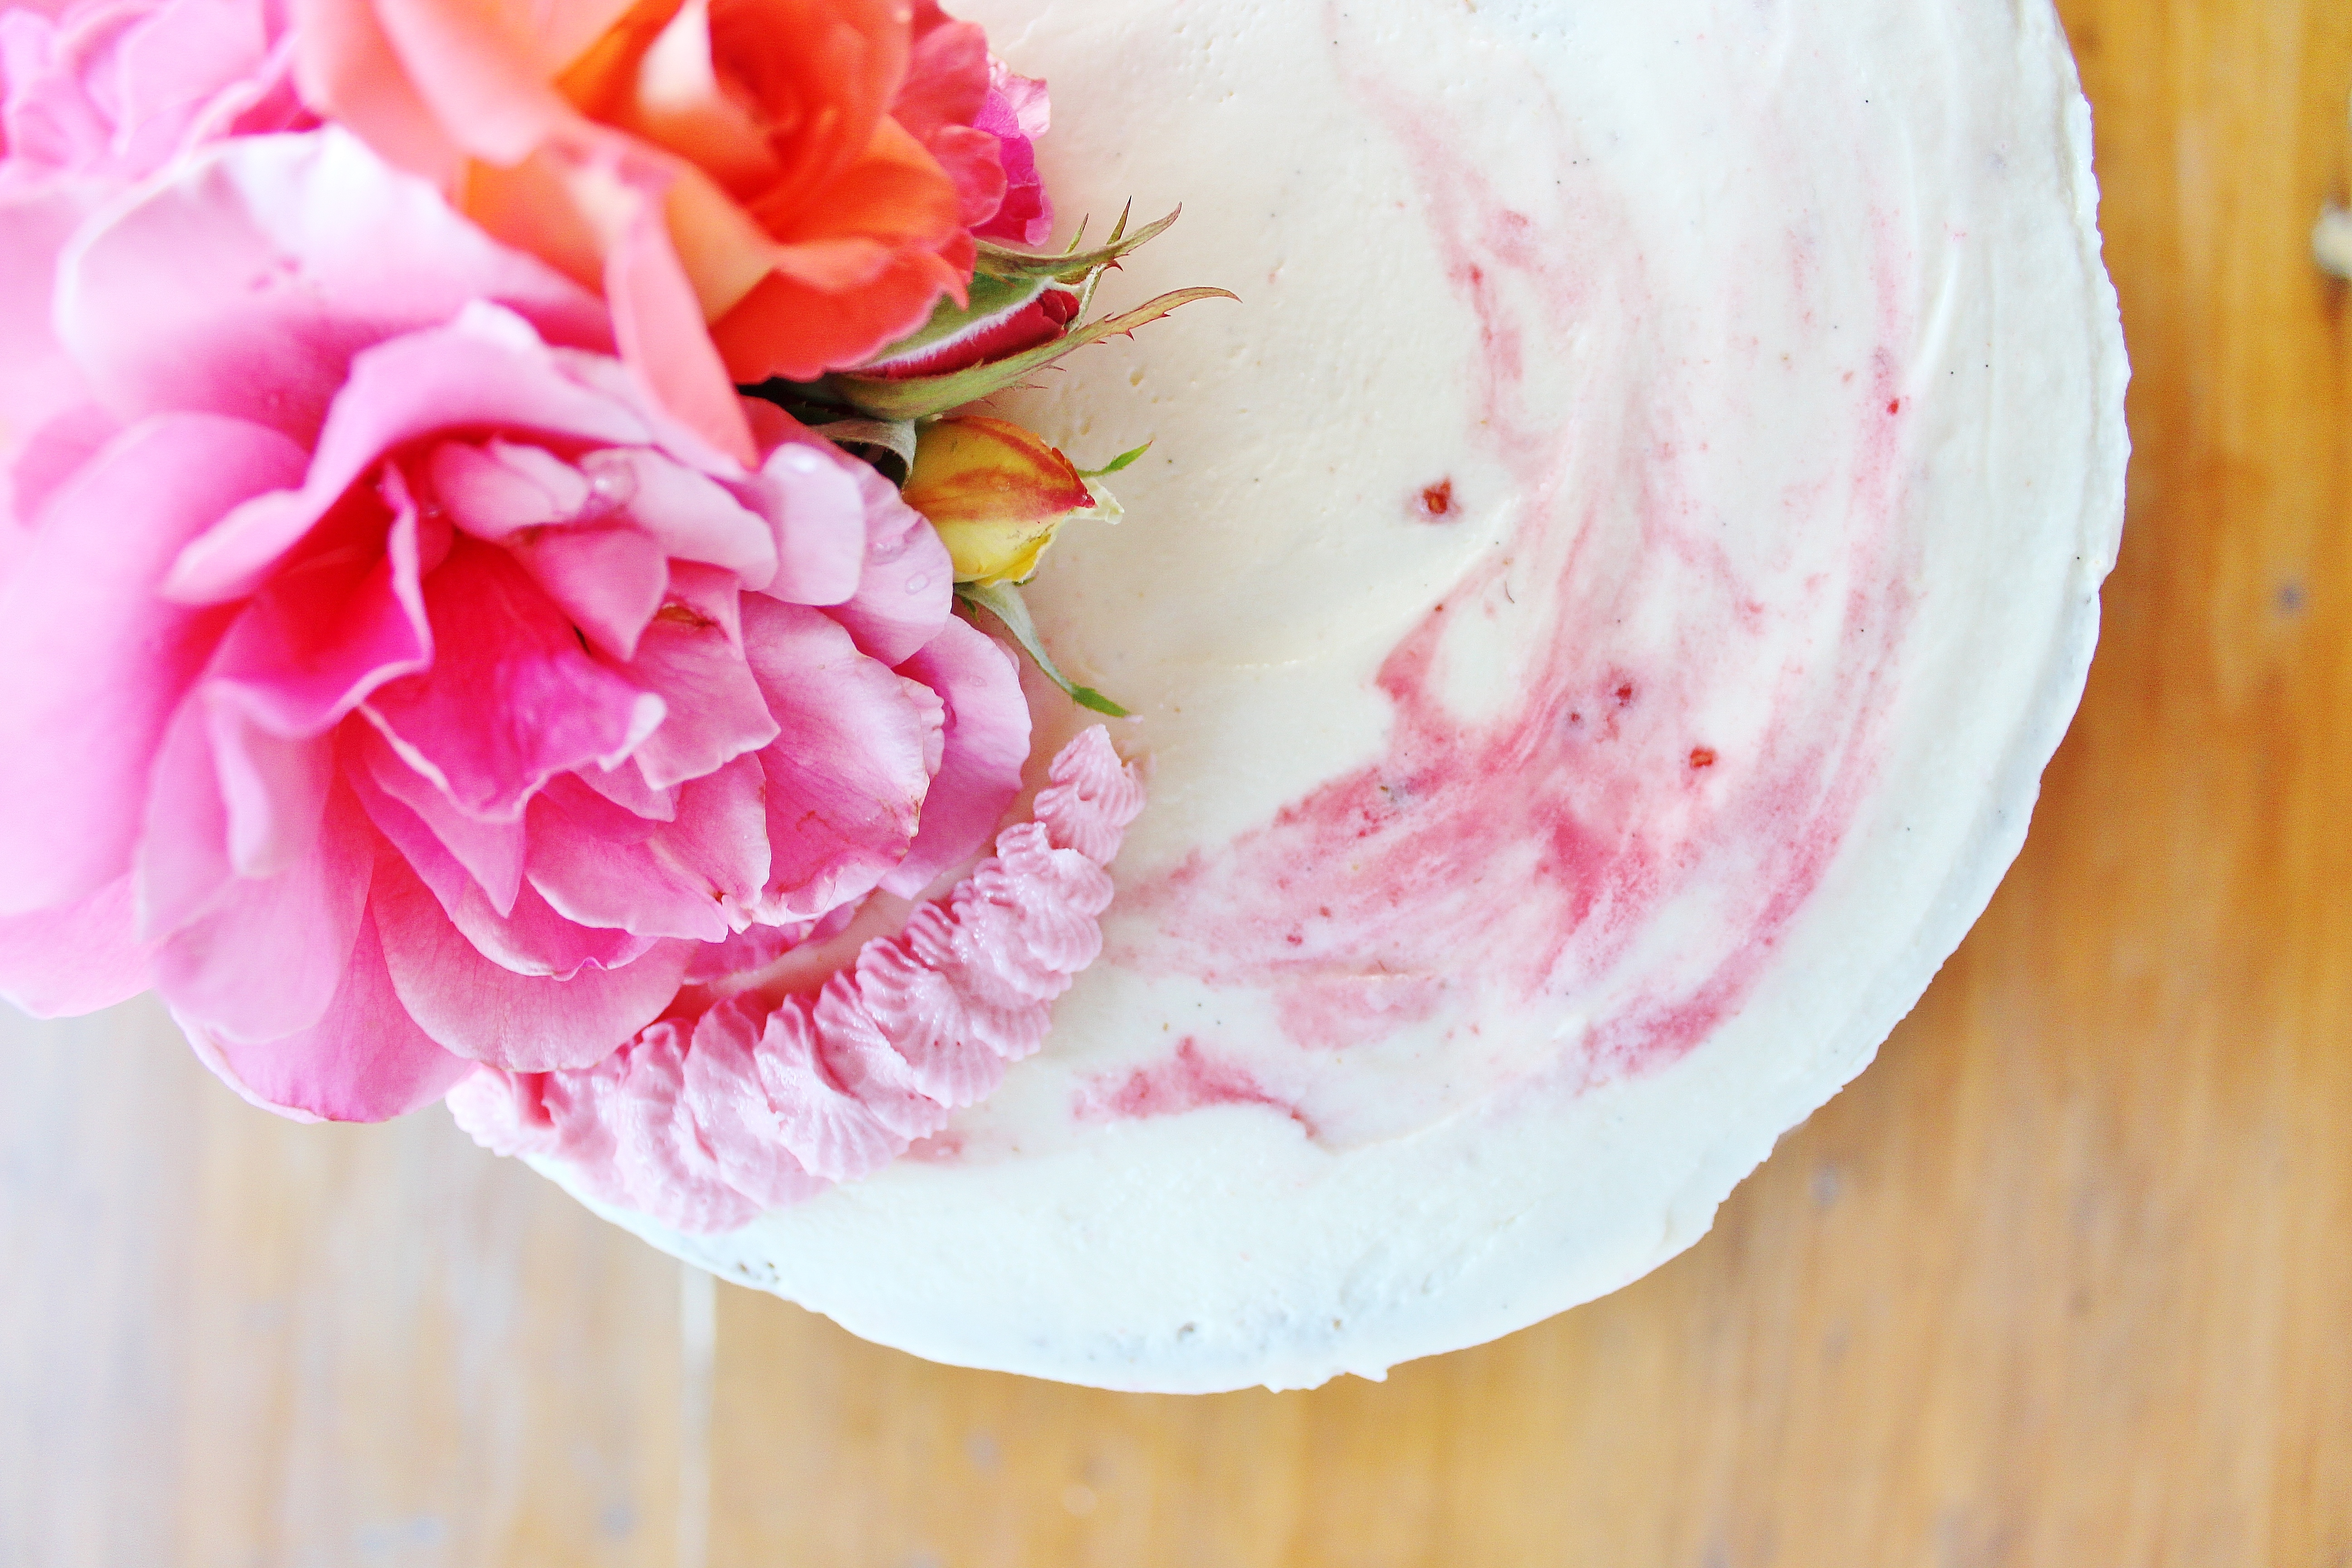
When you take the cake out of the fridge spread a final thin layer of buttercream around the cake, leaving some small portions of the cake slightly exposed. Grab your jammy spoon and bowl; scoop any excess bits of jam hanging around and use the back of the spoon to smear streaks of jam in various parts of the cake. When you’ve done this to your satisfaction, grab a clean spatula or pallet knife and a glass of hot water.
 Dip your pallet knife in the hot water and smooth it around the cake, wiping off any excess icing on a cloth. Do this around the entire cake until it is smooth. Pop in the fridge until you’re ready to serve .
Give yourself a pat on the back, you’ve just made one fine piece of cake!
Extras:
You should have a small amount of excess buttercream – if you want to add extra, special touches to your cake, add a drop of pink food colouring to the buttercream and mix in. Scoop into a piping bag fitted with a closed star tip, and pipe accents around the cake. For me, this was around the base and the roses – get creative!

Gorgeous looking cake, and I’m sure just as tasty! 🙂
Thank you 🙂 I didn’t get to have a slice of this cake, but it’s a great recipe!
I’m grateful you shared that stunning cake with us! It really is beautiful, you did a lovely job 🙂
Oh thank you for the lovely comment!
Well that’s just lovely! I love the pink swirl in the frosting 😀❤️
This is absolutely gorgeous, Gab! Opening up an Etsy store? That sound so cool! 🙂
Thank you, lovely one! I’ll keep you posted about the etsy store, may be a while off yet!
Hello Gab,
I’m going to give this cake a go, looks beautiful.
I have a question, could I make it The day before?
Hi Lucy, that’s so great to hear! You can most certainly make it the day before. Just make sure that you keep it in an air tight container and pop it in the fridge to keep it fresh. Let me know how you go 😀
Hi there, just about to bake this beautiful cake for my little girl’s birthday. I’m assuming I should bake it at 180°C/350°F. Is that right? Thanks! Abi
Hey Abi, you’re totally right, so sorry for not including that! How did the cake go? Happy birthday to your little girl 😀
Hi, I attempted this recipe and it was a disaster. I followed it step by step and for some reason when it was in the oven it bubbled up, over flowed and burned. It was a pretty funny experience, and the snapchats of the progress gave my family and friends something to laugh at. I just couldn’t for the life of me figure out what I did wrong. The only thing I changed was the sugar to raw sugar as I didn’t have normal sugar.
Hi Ebony! I’m so sorry to hear that! I’ve made this cake on countless occasions without any issues. The raw sugar shouldn’t have made too much of a difference (it actually has a higher melting point, so should have resulted in a marginally drier cake). What size pans did you use, and how many? Maybe try it in larger pans? Sorry to hear it didn’t work out – I would have loved to have seen those snapchats though 😛